Adding anims, gump, tiles
Posted: Sun Aug 19, 2007 3:22 pm
Introdiction, what is this about?
What will I teach here?
R: adding new anims to Ultima Online, and an adition tutorial about linking those anims to gumps and tiles.
Ok, i'm writing this because i've searched over the internet but DIDN't anything. And yesterday i was searching for things about creating new bodyIds (if anyone know about that tell me plz) and found something .
.
The old style
ok, first, if you work with verdata.mul files, just download Michelangelo and use .uop files and export a verdata.mul file, BUT I don't use verdata.mul files, so this is useless for me.
Before begin
ok, first: download mulpatcher, here you can find: http://varan.uodev.de/
and, of course, if you want to add an anim, let use an anim to test. if you acces this website http://uo-pixel.de/ you'll find (in the top) a wisp gif, click there, it's the anim download section of that site, well, just browse and choose an good anim.
i'll be using the black heater shield.
http://eriminator.er.funpic.de/anim/bla ... hield.html
with this gump
http://eriminator.er.funpic.de/gump/bla ... hield.html
and the tile, you can use the heater shiled tile, i've modified it using a image editor program. and it's here:
http://i4.photobucket.com/albums/y111/A ... shield.jpg
don't forget to convert it to bmp again, you can do it by using mspaint, just open the jpg and save it as bmp.
A precautionary man has double value
if you want to backup something, you'll need to backup:
anim.mul
anim.idx
art.mul
art.idx
gumpidx.mul
gumpart.mul
tiledata.mul
animdata.mul
body.def
obs.: i'm kind beginner with that so i'm not sure about if you have to backup animdata.mul, but do it for guarantee
let's work
loading the files into mulpatcher
Open Muleditor
ok, go to the 'settings' tab of mulpatcher, and load the files i've said to you to backup (you'll have a lot of editboxes with the file name right above them which that editbox is used to hold, click in the '...' and choose the file) clicking in the load button you'll load into mulpatcher the files (anim.mul and anim.idx, art.mul and art.idx, gumpidx.mul and gumpart.mul are load 'together', so you have only one load for each 2 file group).
Adding the anim
now you've loaded the files
go to the anim tab.
bah... my PROBLEM (trust in me, i'm not joking with you) was find that tab.
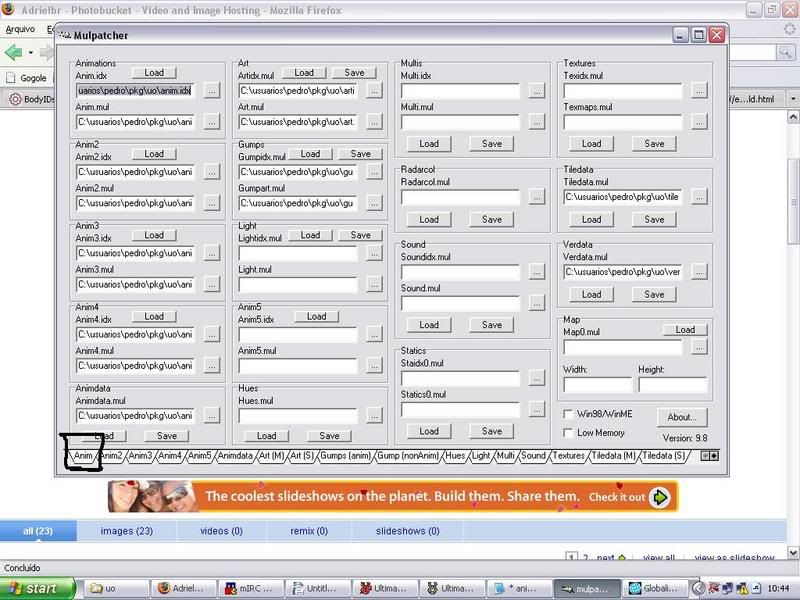
just to guarantee here, http://i4.photobucket.com/albums/y111/A ... atcher.jpg , you have a image of the mulpatcher, and there is 2 buttons on the DOWN LEFT side, the left buttons'll show more tabs on the left, and the right button'll show more tabs on the right.
ok, the anim tab is the first left tab, so click in the left button until you see an anim tab, here, http://i4.photobucket.com/albums/y111/A ... tcher2.jpg .
ok, that is the important:
if you have already opened InsideUO (if you don't have, it's good to have it, search on the google for it, it's easy to find), and have token a look at the animtion section you've seen: high detail creatures, low detail creatures and people and accessories.
these three sections have some difference, that is the number of frame (images) that each anim uses, the shiled is in the people and accessories section.
how do I know in what section do i have to add my anim?
I don't know that, but if you'll add itens, weapons, armors, i think you can use people and accessies section.
ok, and how i define that my anim'll be in that section?
simple, in the anim tab (backing to mulpatcher) you'll have numbers identifying the anims, so:
ID numbers 0-199 contain high detail creatures, 110 frames.
ID numbers 200-399 contain low detail creatures, 65 frames.
ID numbers 400-999 contain people and accessories, 175 frames.
just add your anims betweedn id 400 and 900.
IMPORTANT MARK: anims with the id number (in the left list) writen in red are unused places that YOU CAN ADD YOUR ANIMS, id numbers writen in black are already in use, so don't use it if you don't want overwrite anything. Use blank places (writen in red).
so, find a empty place between 400 and 900. right click on it, then you'll see an pop-up menu, and there is a 'load from file' good, keep it in mind.
ok, now go to that website that i've told to you in which you can find anim, you'll see that the anims are for download in two extensions: .vd and .uop
we'll use .vd anims, download it, extract if from the .rar (or .zip), so you have the .vd file now.
ok, back to the mulpatcher, in the anim section, go to the place you've find that is EMPTY and right click on it, 'load from file', now choose the .vd file.
ok, YOU HAVE THE ANIM added, you don't have to save anything, the anim is, already, in the anim file, write down the anim number (the decimal and hexadecimal number, both).
Adding the GUMP
ok, back to the link sections i've write in the begin, download the gump, extact it and you have the .bmp to the gump.
go to the 'Gumps(anim)' tab on the mulpatcher, find a empty (same rule, writen in red are empty) place and right click in it you'll see 'load from bitmap', click there, choose the black heater shiled gump file (.bmp you've extracted), ok, now right click (again) in the place you've added the gump and click in the "copy existing animation" then it'll appear a dialog box that you can write a hexadecimal numer, and GUESS! write the anim hexadecimal number you've added then "OK", in the right down of the gump list you'll see a text saying:
"animation id: XXXXXX" (where XXXXX is a hexadecimal number).
write that number
Adding the tile/art
ok, go to the "tiledata(s)" section, well, here, you'll need to find a empty place too, but here, empty places arent' with red colour, they are with no name, you'll see in the list, that places are formated with that standard:
NUMBER NAME, exemple:
0x2 ankh
the places that aren't with names are empty, ok, now choose a empty one. you'll see a lot of fields that you can change, here we'll change the name field (put the name you want for the shield).
you'll see a filed named: AnimID, here you'll write the 'animation id' that you've writen down in the gump(anim) tab.
ok, the 'quality' filed, for weapons at least, is the layer of it.
1
One handed weapon
2
Two handed weapon, shield, or misc.
3
Shoes
4
Pants
5
Shirt
6
Helm/Hat
7
Gloves
8
Ring
9
Talisman
10
Neck
11
Hair
12
Waist (half apron)
13
Torso (inner) (chest armor)
14
Bracelet
15
Unused (backpack, but backpacks go to 21)
16
Facial Hair
17
Torso (middle) (sircoat, tunic, full apron, sash)
18
Earrings
19
Arms
20
Back (cloak)
21
Backpack
22
Torso (outer) (robe)
23
Legs (outer) (skirt/kilt)
24
Legs (inner) (leg armor)
25
Mount (horse, ostard, etc)
26
NPC Buy Restock container
27
NPC Buy no restock container
28
NPC Sell container
29
Bank Box
in this case we'll use the layer 2, just put 2 in the quality field.
mark the wearable ckeckbox, and the 'a' chekcbokx or 'an' checkbox if your weapon name begins with 'a','e','i','o' or 'u' (i'm amlmost sure that the 'A'/'AN' checkbox is for that)
well, you'll need only that.
In the list (just remembering, we are in the tiledata(s) tab)look at the id your iten have, in the list, write that number.
Go to the Art(s) tab, and search for that ID (from the tiledata(s) tab), right click on it "load from bitmap" and them choose the .bmp file for the tile of your shield.
Only God save
ps: this rule about saving had changed when computers come up
ok, back to the setting tab, SAVE all files you've opened.
the anim files (anim.mul, anim.idx) are modified directly (almost sure) so you don't need to save it.
linking things in body.def
ok, now close mulpatcher, go to body.def file that is in the UO folder.
go to the last line (just ignore the others, you'll not need to modify them), you'll need here to know the decimal value of the gump animation id (that you've seen and writen down, that number closer to the list, 'animation id: XXX') just open the windos calculator and convert using it. you'll need the decimal number of your anim too (you can see in the anim tab), and then you'll add that line:
gump animation id in decimal {anim id in decimal} hue of the item, ex:
11183 {422} 0
hue 0 will not change the item hue.
a tip about body.def, text that are preced by # are ignored, like
#my black heater shiled begins here
11182 {422} 0
#my black heater shiled ends here
so you can add your coments. save the file, now.
The work is done !
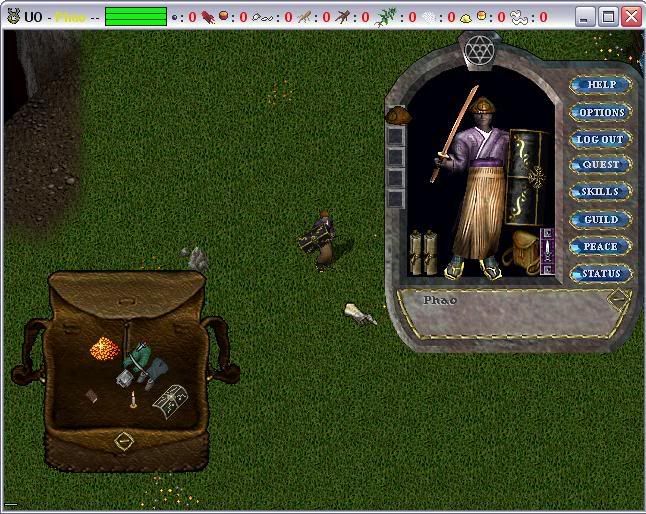
open Ultima Online and you'll add the item, the item id is the number of it in the tiledata(s) list (here it was 0x3ffd)
so:
'add 0x3ffd
done
http://i4.photobucket.com/albums/y111/A ... tled-1.jpg
What will I teach here?
R: adding new anims to Ultima Online, and an adition tutorial about linking those anims to gumps and tiles.
Ok, i'm writing this because i've searched over the internet but DIDN't anything. And yesterday i was searching for things about creating new bodyIds (if anyone know about that tell me plz) and found something
The old style
ok, first, if you work with verdata.mul files, just download Michelangelo and use .uop files and export a verdata.mul file, BUT I don't use verdata.mul files, so this is useless for me.
Before begin
ok, first: download mulpatcher, here you can find: http://varan.uodev.de/
and, of course, if you want to add an anim, let use an anim to test. if you acces this website http://uo-pixel.de/ you'll find (in the top) a wisp gif, click there, it's the anim download section of that site, well, just browse and choose an good anim.
i'll be using the black heater shield.
http://eriminator.er.funpic.de/anim/bla ... hield.html
with this gump
http://eriminator.er.funpic.de/gump/bla ... hield.html
and the tile, you can use the heater shiled tile, i've modified it using a image editor program. and it's here:
http://i4.photobucket.com/albums/y111/A ... shield.jpg
don't forget to convert it to bmp again, you can do it by using mspaint, just open the jpg and save it as bmp.
A precautionary man has double value
if you want to backup something, you'll need to backup:
anim.mul
anim.idx
art.mul
art.idx
gumpidx.mul
gumpart.mul
tiledata.mul
animdata.mul
body.def
obs.: i'm kind beginner with that so i'm not sure about if you have to backup animdata.mul, but do it for guarantee
let's work
loading the files into mulpatcher
Open Muleditor
ok, go to the 'settings' tab of mulpatcher, and load the files i've said to you to backup (you'll have a lot of editboxes with the file name right above them which that editbox is used to hold, click in the '...' and choose the file) clicking in the load button you'll load into mulpatcher the files (anim.mul and anim.idx, art.mul and art.idx, gumpidx.mul and gumpart.mul are load 'together', so you have only one load for each 2 file group).
Adding the anim
now you've loaded the files
go to the anim tab.
bah... my PROBLEM (trust in me, i'm not joking with you) was find that tab.
just to guarantee here, http://i4.photobucket.com/albums/y111/A ... atcher.jpg , you have a image of the mulpatcher, and there is 2 buttons on the DOWN LEFT side, the left buttons'll show more tabs on the left, and the right button'll show more tabs on the right.
ok, the anim tab is the first left tab, so click in the left button until you see an anim tab, here, http://i4.photobucket.com/albums/y111/A ... tcher2.jpg .
ok, that is the important:
if you have already opened InsideUO (if you don't have, it's good to have it, search on the google for it, it's easy to find), and have token a look at the animtion section you've seen: high detail creatures, low detail creatures and people and accessories.
these three sections have some difference, that is the number of frame (images) that each anim uses, the shiled is in the people and accessories section.
how do I know in what section do i have to add my anim?
I don't know that, but if you'll add itens, weapons, armors, i think you can use people and accessies section.
ok, and how i define that my anim'll be in that section?
simple, in the anim tab (backing to mulpatcher) you'll have numbers identifying the anims, so:
ID numbers 0-199 contain high detail creatures, 110 frames.
ID numbers 200-399 contain low detail creatures, 65 frames.
ID numbers 400-999 contain people and accessories, 175 frames.
IMPORTANT MARK: anims with the id number (in the left list) writen in red are unused places that YOU CAN ADD YOUR ANIMS, id numbers writen in black are already in use, so don't use it if you don't want overwrite anything. Use blank places (writen in red).
so, find a empty place between 400 and 900. right click on it, then you'll see an pop-up menu, and there is a 'load from file' good, keep it in mind.
ok, now go to that website that i've told to you in which you can find anim, you'll see that the anims are for download in two extensions: .vd and .uop
we'll use .vd anims, download it, extract if from the .rar (or .zip), so you have the .vd file now.
ok, back to the mulpatcher, in the anim section, go to the place you've find that is EMPTY and right click on it, 'load from file', now choose the .vd file.
ok, YOU HAVE THE ANIM added, you don't have to save anything, the anim is, already, in the anim file, write down the anim number (the decimal and hexadecimal number, both).
Adding the GUMP
ok, back to the link sections i've write in the begin, download the gump, extact it and you have the .bmp to the gump.
go to the 'Gumps(anim)' tab on the mulpatcher, find a empty (same rule, writen in red are empty) place and right click in it you'll see 'load from bitmap', click there, choose the black heater shiled gump file (.bmp you've extracted), ok, now right click (again) in the place you've added the gump and click in the "copy existing animation" then it'll appear a dialog box that you can write a hexadecimal numer, and GUESS! write the anim hexadecimal number you've added then "OK", in the right down of the gump list you'll see a text saying:
"animation id: XXXXXX" (where XXXXX is a hexadecimal number).
write that number
Adding the tile/art
ok, go to the "tiledata(s)" section, well, here, you'll need to find a empty place too, but here, empty places arent' with red colour, they are with no name, you'll see in the list, that places are formated with that standard:
NUMBER NAME, exemple:
0x2 ankh
the places that aren't with names are empty, ok, now choose a empty one. you'll see a lot of fields that you can change, here we'll change the name field (put the name you want for the shield).
you'll see a filed named: AnimID, here you'll write the 'animation id' that you've writen down in the gump(anim) tab.
ok, the 'quality' filed, for weapons at least, is the layer of it.
1
One handed weapon
2
Two handed weapon, shield, or misc.
3
Shoes
4
Pants
5
Shirt
6
Helm/Hat
7
Gloves
8
Ring
9
Talisman
10
Neck
11
Hair
12
Waist (half apron)
13
Torso (inner) (chest armor)
14
Bracelet
15
Unused (backpack, but backpacks go to 21)
16
Facial Hair
17
Torso (middle) (sircoat, tunic, full apron, sash)
18
Earrings
19
Arms
20
Back (cloak)
21
Backpack
22
Torso (outer) (robe)
23
Legs (outer) (skirt/kilt)
24
Legs (inner) (leg armor)
25
Mount (horse, ostard, etc)
26
NPC Buy Restock container
27
NPC Buy no restock container
28
NPC Sell container
29
Bank Box
in this case we'll use the layer 2, just put 2 in the quality field.
mark the wearable ckeckbox, and the 'a' chekcbokx or 'an' checkbox if your weapon name begins with 'a','e','i','o' or 'u' (i'm amlmost sure that the 'A'/'AN' checkbox is for that)
well, you'll need only that.
In the list (just remembering, we are in the tiledata(s) tab)look at the id your iten have, in the list, write that number.
Go to the Art(s) tab, and search for that ID (from the tiledata(s) tab), right click on it "load from bitmap" and them choose the .bmp file for the tile of your shield.
Only God save
ps: this rule about saving had changed when computers come up
ok, back to the setting tab, SAVE all files you've opened.
the anim files (anim.mul, anim.idx) are modified directly (almost sure) so you don't need to save it.
linking things in body.def
ok, now close mulpatcher, go to body.def file that is in the UO folder.
go to the last line (just ignore the others, you'll not need to modify them), you'll need here to know the decimal value of the gump animation id (that you've seen and writen down, that number closer to the list, 'animation id: XXX') just open the windos calculator and convert using it. you'll need the decimal number of your anim too (you can see in the anim tab), and then you'll add that line:
gump animation id in decimal {anim id in decimal} hue of the item, ex:
11183 {422} 0
hue 0 will not change the item hue.
a tip about body.def, text that are preced by # are ignored, like
#my black heater shiled begins here
11182 {422} 0
#my black heater shiled ends here
so you can add your coments. save the file, now.
The work is done !
open Ultima Online and you'll add the item, the item id is the number of it in the tiledata(s) list (here it was 0x3ffd)
so:
'add 0x3ffd
done
http://i4.photobucket.com/albums/y111/A ... tled-1.jpg